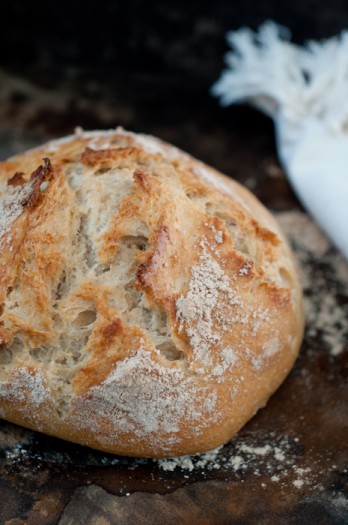
Ok so I have been telling EVERYONE about this. I am so in love with this method, it’s pretty ridicules. It is SO easy though!
We have seriously been having a delicious loaf of fresh artisan bread with dinner every night since I started doing this, which my husband requested because the bread is so yummy.
The wonderful thing about this method I am going to tell you about is you can make all kinds of breads with it – not just these beautiful artisan loaves.
I have been making the kid’s sandwich bread this way, and you can also make a brioche version and use it to make sweet breads. I totally made these awesome donuts Saturday morning before we butchered ducks, oh my word they were amazing. Brushed in butter and then sprinkled with cinnamon and sugar like a churro, I ate so many of them.
So for the FULL details of this method and all the amazing recipes you can make I highly, highly recommend getting the book, “Artisan Bread in 5 Minutes A Day” by Jeff Hertzberg and Zoe Francois. There are seriously pages and pages full of super yummy sounding breads and treats. I have just done the tip of the iceberg and it’s been glorious. You can click on the link below to purchase it from Amazon but I am also planning on doing a give-away later this week!
I was given the book by a friend of ours who is a doctor in the Chemistry department at the university where my husband is working on his Ph.D. I had to have the book because he kept bringing over these amazing loaves of bread and I couldn’t believe he had time to make artisan bread with working and being a dad and everything, since typically this kind of bread takes days to make.
What you do with this method is you actually make enough dough for several loaves and store the dough in the fridge (or the garage as I am currently doing since it’s quite cold out there) and when you feel like having a loaf of bread you grab a bit of dough and make one.
Now Robert figured out you can add any kind of flavor to this bread and it changes it completely and is so much fun to experiment with. He would add miso, or herbs, sun-dried tomatoes, he even made a tamale loaf once. I have been adding about a cup of my sourdough starter to it personally and yum! This is good stuff. Over time, as the dough sits, you do eventually end up with a bit of a sourdough flavor without adding the starter though.
Now to make this bread, you will need something to store the dough in, it needs to be about 5-6 quarts. When Robert moved back to Hungary a couple weeks ago he gave me his tubs which are large, round rubbermaid type tubs which the lids do not completely seal on. They work wonderfully, but you could certainly use something you have around the house, you just don’t want the lid to be completely sealed. I will try to find the ones Robert gave me and include a link.
You will also need a baking stone and a rimmed pan and that’s about it. The wonderful thing about this bread, is there is no kneading, no proofing, it is pretty hands off.
Ok so lets get started.
******UPDATE: I just did a batch of this dough but I eliminated the yeast completely and used 3/4 cup of sourdough starter. Then rather than letting it rise on the counter for two hours I let it set overnight. I then put it out in the garage (a.k.a the extra fridge) for about 6 hours. Shaped and baked it as instructed below and it was delicious! I am going to continue experimenting with the amount of starter and rise times but since there has been so much interest in the sourdough method I decided to update what I have so far
- 3 cups lukewarm water
- 1½ tablespoons yeast
- 1½ tablespoons kosher salt
- 6½ cups unsifted, unbleached, all-purpose white flour
- cornmeal or other flour for dusting
- In your large tub or whatever you plan to store the dough in, place all the ingredients and stir with a wooden spoon until the dough is homogenous. You may need to get in there with your hands a bit to break things up. The dough should be just moist enough to ooze to the sides of the container when you let it sit for a second.
- Cover and let sit at room temperature for about 2 hours. The dough is ready at this point but is easier to handle after it has been in the fridge.
- After 2 hours move the tub to the fridge where it can stay for up to a week.
- When you are ready to bake a loaf, simply grab your tub of dough and with well floured hands cut off a hunk about the size of a grapefruit.
- Shape the loaf into a ball or oblong loaf, you will need to keep your hands well floured.
- Place the shaped loaf on a non-rimmed pan or pizza peel with lots of flour or cornmeal to keep it from sticking. Put the tub of dough back in the fridge.
- Allow the shaped loaf to sit at room temperature for about 40 minutes, it does not need to be covered.
- About 20 minutes before baking, preheat your oven (with a baking stone in it) to 450˚. Also place a broiler pan on another rack below the stone.
- When the oven is ready, liberally flour the top of the loaf and use a knife to slash the top of the loaf.
- Open the oven and carefully slide the loaf onto the baking stone. The book says to just sort of jerk the loaf off the pizza peel, but I have not successfully done that yet (I keep trying though!) so I just use my dough scraper or a large spatula to sort of slide the dough off.
- Once the dough is on the stone, pour a glass of water into the boiler pan and quickly shut the oven door to keep that steam in the oven.
- Bake the loaf about 30 minutes or until the crust is a deep, golden brown.
- Remove from the oven and let rest until cool.

- Huckleberry Plum Pie - January 1, 2017
- Fresh Mango Sorbet - July 17, 2016
- Steak Caesar Salad - June 8, 2016


