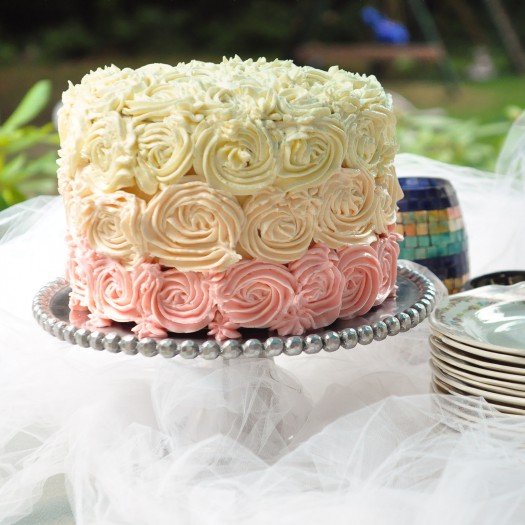
Alright friends, here it is! That scrumptious Vanilla Bean Cake I made for my sister’s baby shower last month. Ya it’s taken me a bit to get this up, I know. Things have been a little nut-so around here and I’ve been a little frazzled.
I think things are slowing down though so maybe I can get ya’ll caught up on what I’ve been cookin’ around here.
I’m starting to cook with a lot of beef because after how quickly we went through our 1/4 cow last year, we opted to get a half for this year so be expecting a lot of beef recipes coming up!
But I’m guessing your not here to hear about beef.
You’re here because of this cake and I’m guessing you want to know more about it
So the cake itself is one I’ve made many times, my basic, turns-into-everything, cake.
I love everything about it. It has the perfect crumb, the perfect moistness. Mmmm….
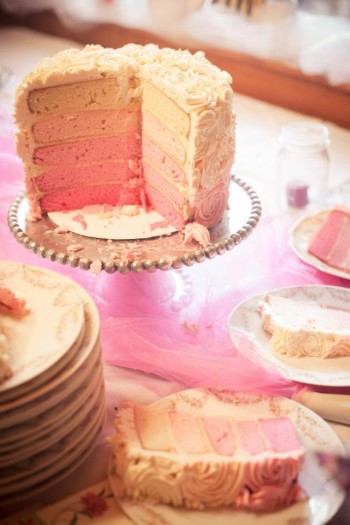
I went ahead and attempted to do the ombre coloring so popular these days, with mild success. I was really going for more subtle pinks but oh well. It was still fun:
Then there’s the buttercream.
Swiss merengue buttercream.
In my world that is the only buttercream. I could eat swiss merengue buttercream everyday for the rest of my life and be perfectly happy. Unlike it’s counterpart, the regular everyday buttercream, it is not too sweet, it’s much more buttery and silky.
I eat it by the spoonful. (No I did not forget to type ‘could’ as in ‘could eat it by the spoonful’ I actually do it.)
- FOR THE CAKE
- 1 pound unsalted butter
- 3 cups vanilla sugar (I make my own which allows for large quantity use, if you don't have some made up just use regular granulated sugar)
- 6 large eggs
- 4½ cups all-purpose flour
- 1½ tablespoons baking powder
- ½ teaspoon salt
- 1½ cups half and half
- 2 tablespoons pure vanilla extract (preferably homemade, see link)
- 2 vanilla beans, scraped
FOR THE SWISS MERENGUE BUTTERCREAM - 2½ cups sugar
- 10 large egg whites
- 4 cups (8 sticks or 2 pounds) unsalted butter, cut into pieces
- 2 teaspoons pure vanilla extract
FOR THE PASTRY CREAM - 1½ cups heavy cream
- ½ cup sugar
- 2 large eggs, plus one extra yolk
- 2 tbs flour
- 2 tsp vanilla extract
- TO MAKE THE CAKE
- Preheat oven to 325 degrees.
- Prepare your cake pan. If you have more than one of course prepare them all, I have only one. I used a 9" round for this. To prepare your pans, cut out a circle of parchment paper to fit the bottom of the pan. Place the parchment in the pan and brush the entire inside of the pan with soft butter, then throw a handful of flour in and shake that around to coat the butter. Tap out the excess. Set the pan aside.
- In the bowl of an electric mixer fitted with the paddle attachment, cream together butter and sugar until light and fluffy, 5 to 6 minutes.
- Add eggs, one at a time, and beat until creamy, occasionally scraping down sides of the bowl using a spatula.
- In a large bowl, sift together flour, baking powder, and salt.
- In a small bowl, mix together cream and vanilla and vanilla seeds.
- With mixer on low speed, add flour mixture, alternating with cream mixture, beginning and ending with flour; beat until just combined.
- Divide batter into five even portions, using a kitchen scale is the best way to do this accurately. If you wish to color the layers, do that after you have divided it unless you want them all the same color.
- Pour one portion of batter into prepared pan and bake until a toothpick inserted into the cake comes out clean, about 20-25 minutes. Let cool completely on a wire rack before removing from pan. Repeat for each layer.
TO MAKE THE FROSTING - Place the egg whites and sugar in a heat proof bowl (I use my kitchenaid bowl) and place over a pot of boiling water. Whisk briskly until sugar has melted, you can test it by rubbing a little of the mixture between your fingers, it should feel smooth. Remove from heat.
- Place the bowl on your mixer and fit with the whisk attachment. Beat on high speed until the whites have cooled to room temperature, about 10 minutes.
- Once the mixture has cooled start adding the butter a piece at a time. It may start to look curdled at some point at this stage but have no fear, it will smooth out again, just keep beating.
- Switch to the paddle attachment and add the vanilla extract.
TO MAKE THE PASTRY CREAM - Place the cream in a medium size saucepan and bring to a simmer over medium high heat, just so there is bubbles around the edges.
- Meanwhile, combine the sugar, egg and extra yolk, and flour in a small bowl and whisk until smooth and slightly frothy.
- While whisking, pour about a tablespoon of the hot cream into the egg mixture, continue whisking and adding cream until you have added about half of the cream. Then slowly pour the cream/egg mixture back into the saucepan with the rest of the cream and put over medium high heat, whisking the whole time, until thick. The whisk should leave a track in the mixture when you run it through.
- Remove from the heat and add the vanilla.
- Pour into a bowl and cover with plastic wrap, putting the plastic directly on top of the pastry cream so it is touching it. This will prevent a skin from forming.
- Chill completely in the fridge, about 4-6 hours.
ASSEMBLING THE CAKE - The first thing you need to do is fold about a cup of the buttercream into the pastry cream.
- Start stacking the cake by placing the darkest colored layer on whatever cake board or tray you are using. Then spread a layer of pastry cream on the cake and then top with another cake layer, continue until you have all the layers stacked. I went ahead and added a dowel in the center for support.
- Dirty ice the cake with a thin layer of buttercream, filling in any cracks or holes between the layers. Place cake in the freezer for about 15 minutes to make it easier to frost. Longer if necessary. It does get a bit wobbly with so many layers.
- I did not color the lightest layer of icing, just go ahead and pipe the roses on the top and a layer on the side.
- Add a teensy bit of pink (or whatever color) food coloring to the remaining icing and pipe the next layer of roses.
- Then add just a teensy bit more coloring to the remaining icing and finish piping and there you have it!
- Huckleberry Plum Pie - January 1, 2017
- Fresh Mango Sorbet - July 17, 2016
- Steak Caesar Salad - June 8, 2016

